![E140/E150 [2006 - 2010]](/uploads/Toyota_Corolla_E140_2006_-_2010_.jpg)


DASHBOARD
The following controls and instrumentation are located on the instrument panel. For ease of use, the handles, buttons and control devices located on the instrument panel are marked with symbols of their functional purpose.
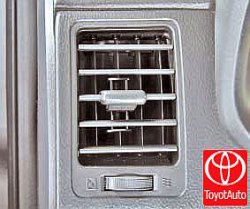
1 - nozzles of the ventilation and interior heating system are designed to adjust the air flow from the heater, air conditioner or ventilation system. The direction of air flow is regulated by turning the deflectors in the appropriate direction.
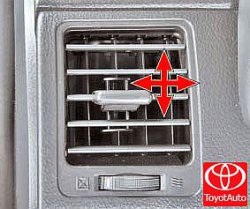
At the bottom of the nozzles there is a handle for adjusting the amount of air supplied through them.
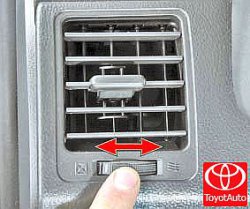
When the handle is turned all the way to the right, the damper opens completely (maximum air flow). When the handle is turned all the way to the left, the damper closes completely, blocking the air flow. By setting the handle to intermediate positions, adjust the amount of air flow.
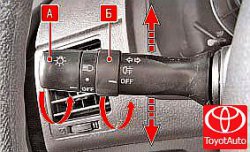
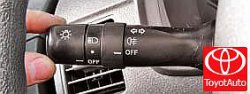
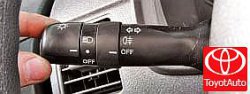
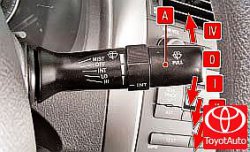
2 - lever switch for outdoor lighting and direction indicators. The lever switches the following modes of operation of the switch:
– turning on direction indicators.
Move the lever up or down until the direction indicators turn on. When the lever is moved up or down, the indicator 10 or 7 flashes in the instrument cluster, respectively. When the steering wheel returns to the straight-ahead position, the lever automatically returns to its original position. When changing lanes, to turn on the direction indicator, it is enough to press the lever in the up or down direction only until there is a noticeable resistance, without fixing the lever. When released, the lever will return to its original position;
NOTE
The turn signal only works when the ignition is on.
– headlights on mode.
To turn on the headlights, turn the handle A of the switch lever around its axis. In the headlights on mode, the switch can take two positions:
- everything is off;
– marker lights are switched on in the front and rear lights, as well as the illumination of the instrument cluster;

– the dipped beam is on. To switch the headlights from low to high, move the lever away from you. When the high beam headlights are switched on, the warning lamp lights up in the instrument cluster .
To signal high beam headlights, move the switch lever one position towards the steering wheel (the exterior light switch knob must be in position) and release.

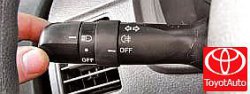
To turn on the fog lights, turn switch B and align with the icon.
To turn off the fog lights, turn switch B to the "OFF" position.
3 - manual downshift lever in the gearbox (see "Gearbox control").
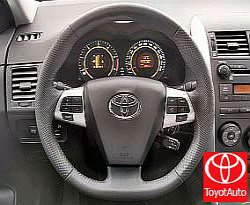
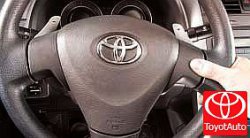
4 - steering wheel. The following switches and buttons are located on the steering wheel:
– the switch of a sound signal. To turn on the horn, press anywhere on the steering wheel pad;
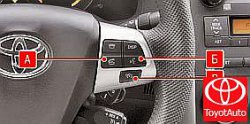
- Bluetooth system keys with the ability to control the phone and the button to turn on the speed limiter:
A - button to answer incoming phone calls;
B - loudspeaker switch;
B - speed limiter key;

- audio control buttons from the steering wheel.
Using the buttons on the left side of the steering wheel, you can control some of the functions of the audio system.
A - volume control key;
B - file selection key, search for radio stations or fast forward backward;
B - power button for the audio system.
5 - instrument cluster (see "Instrument cluster").
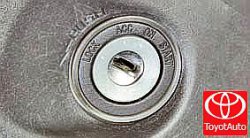
6 - the ignition switch (lock), combined with an anti-theft device, is located on the right side of the steering column. The key in the lock can occupy one of four positions:

LOCK - the ignition is off, when the key is removed, the anti-theft device is turned on. For guaranteed blocking of the steering shaft, turn the steering wheel to the right or left until it clicks. To turn off the anti-theft device, insert the key into the ignition switch and, turning the steering wheel slightly to the right and left, turn the key to the “ACC” position;
WARNING
Do not turn off the ignition or remove the key from the lock while driving: the steering will be locked and the car will become uncontrollable.

ACC - ignition is off, the key cannot be removed, the steering is unlocked. The power supply circuits of the sound signal, outdoor lighting, high-beam headlights, radio equipment are turned on;

ON - the ignition is on, the key cannot be removed, the steering is unlocked. Ignition, instruments and all electrical circuits are on; START - the ignition and starter are on, the key cannot be removed, the steering is unlocked. This position of the key is not fixed; when released, the key returns to the “ON” position under the action of the spring force.
NOTE
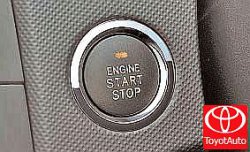
In a variant version, the vehicle can be equipped with an intelligent engine start system Push Start.
WARNING
On Toyota Corolla cars, you can start the engine only by pressing the brake pedal (models with a robotic and automatic transmission) or the clutch pedal (models with a manual transmission).
7 - lever for manual overdrive in the gearbox (see "Gearbox control").
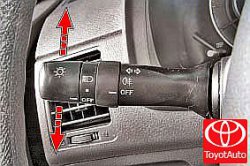
8 - switch lever of the cleaner and washer with a button for switching the display modes of the on-board computer.
The switch turns on the electrical circuits when the ignition is on.
The lever can take the following positions:
0 - wiper off;
I - intermittent mode. To turn it on, move the stalk switch up to the first fixed position. To change the length of the pause, turn switch A clockwise (long pauses) or counterclockwise (short pauses). Switch A sets four modes of intermittent wiper operation.
II - slow mode. To turn it on, move the stalk up to the second fixed position;
III - fast mode. To turn it on, move the stalk up to the third fixed position.
IV - short-term mode. To turn it on, move the stalk switch down.
By moving the steering column switch towards yourself, the windshield washer is turned on (non-fixed position). When you press the steering column switch simultaneously with the washer, the wiper will automatically turn on, the brushes of which will perform two work cycles.
NOTE
The windshield wipers only operate when the ignition is on and the hood is closed. If there is a foreign object on the windshield, the wiper attempts to remove the object. If the obstacle continues to block the wiper, it stops working. Remove the obstruction and turn on the wiper again.
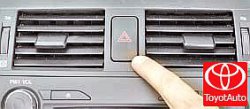
9 - alarm switch. When the switch button is pressed, all direction indicators and signaling devices installed in the instrument cluster light up with a flashing light. Pressing the key again turns off the alarm.
NOTE
The alarm system works at any position of a key in the switch (lock) of ignition.
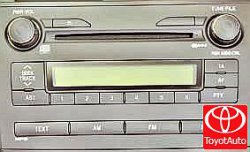
10 - head unit of the audio system (see "Head unit of the audio system").
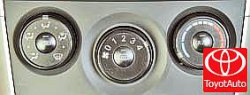
11 - control unit for the heating, air conditioning and ventilation system of the passenger compartment (see "Heating, air conditioning and ventilation of the passenger compartment").
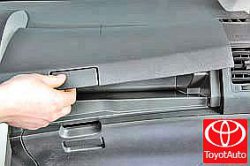
12 – the top ware box (see "Glove boxes of salon").
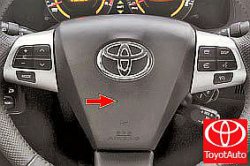
13 - front passenger airbag installation area. In combination with the seat belt, the airbag provides head and chest protection for the occupant in a severe frontal collision.
WARNING
The airbags do not deploy: – with the ignition off; – in light frontal collisions; – in light side impacts; – in collisions; – in the event of a rollover.
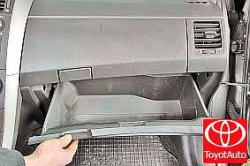
14 - lower glove box (see "Salon glove boxes").
15 - switches for heating the front seats.
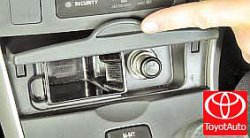
16 - an ashtray with a cigarette lighter (see "Ashtrays").
17 - gearbox control lever (see "Gearbox control").
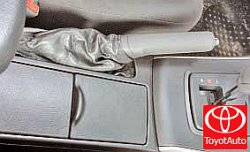
18 - parking brake lever.

To brake the car with the parking brake, lift the lever all the way up - signal indicator 25 will light up in the instrument cluster in red.

To brake the car, pull the lever up a little, press the button at the end of the lever handle and lower it all the way down. The indicator should turn off.
19 - accelerator pedal.
20 - brake pedal.
21 - handle for adjusting the position of the steering wheel. A steering column is installed on the car, adjustable in tilt and reach. Before driving, adjust the position of the steering wheel so that it is convenient to drive the car and at the same time the instruments in the combination are clearly visible.
NOTE
We recommend adjusting the steering column only after you have placed the seat in a comfortable position.
WARNING
Adjust the steering wheel only when the vehicle is stationary. If you try to make adjustments while driving and the steering column does not lock firmly into place and it suddenly moves, you may lose control of your vehicle.
To select the optimal position of the steering wheel, lower the lever down.
Set the steering wheel to the desired position.
Lock the steering column by moving the lever to its highest (original) position.
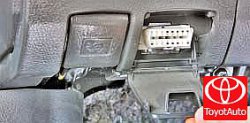
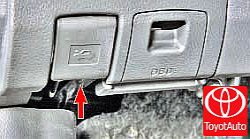
22 - diagnostic connector.
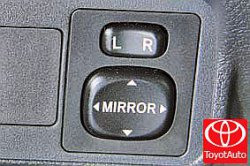
23 - drive of external rear-view mirrors (see "Rear-view mirrors").
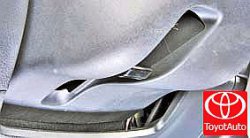
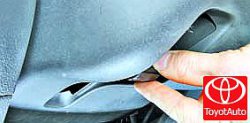
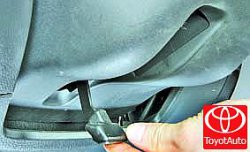
24 - hood lock drive lever. By turning the lever towards you, the hood lock is unlocked. At the same time, the front edge of the hood is raised to provide access to the hood safety hook handle.
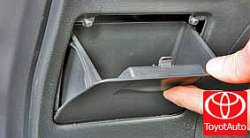
25 - a box for small items.

26 - block of switches for the headlight corrector and headlight washer. To turn on the headlight washer, turn on the headlights and press switch A.
The headlight beam corrector B is equipped with an electric drive and allows you to smoothly change the angle of the headlights in accordance with the vehicle load, which prevents dazzling of oncoming drivers. At the same time, the correct adjustment of the headlights ensures visibility for the driver.
Headlight range adjustment has six positions (0, 1, 2, 3, 4, 5) and is only possible when low beam is on. The regulator positions roughly correspond to the following loading states:
0 - one driver;
1 - driver and passenger in the front seat;
2 - all seats are occupied, the trunk is empty;
3 - only the driver's seat is occupied, the trunk is fully loaded;
4 - the driver and passenger in the front seat, the trunk is fully loaded;
5 - all seats are occupied, the trunk is fully loaded.
Source: http://toyotauto.net/corolla/panel-priborov.html