At the factory, when adjusting the clutch drive, the following dimensions are set: size 1 (between the bracket on the gearbox and the clutch release fork), which should be 86 ± 5 mm, and size 2 (between the bracket and the crimped part of the threaded cable end), which should be 60±5 mm.
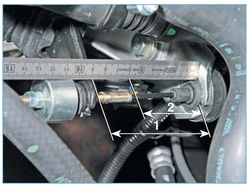
In this case, the clutch pedal is located at a distance of 105–110 mm from the floor - approximately at the same level as the brake pedal.
During the operation of the car, the clutch discs wear out, while the dimensions 1 and 2 increase, and the pedal travel increases. The pedal is higher than the floor and the clutch starts to engage at the end of the pedal stroke (too high). Therefore, during operation, every 15 thousand kilometers, a check and, if necessary, adjustment of the clutch release drive should be carried out.
Before adjusting with a metal brush, we clean the threaded tip of the clutch cable from dirt and corrosion. To adjust the threaded tip of the cable with a “10” wrench, unscrew the lock nut 1, holding the adjusting nut 2 with a second wrench of the same size.

Then, with the clutch pedal released, use the “10” key to unscrew the adjusting nut, holding the end of the cable by the hexagon with the “7” key, achieving the above size 2.
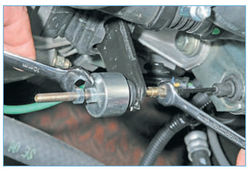
Size 1 is not adjustable in operation. Pressing the clutch pedal several times, check the distance again. For an adjusted clutch, the fork travel should be 28–35 mm. In this case, the reverse gear should be engaged with the engine running without crackling.
Repeat the adjustment if necessary.
At the end of the adjustment, tighten the locknut.
Source: http://wiki.zr.ru/51-1_%D0%9E%D0%B1%D1%81%D0%BB%D1%83%D0%B6%D0%B8%D0%B2%D0% B0%D0%BD%D0%B8%D0%B5_Stepway
![1 generation [2009 - 2014]](/uploads/Renault_Sandero_2009-2014_.jpg)
