Tools:
- Jack
- Support legs
- Calipers
- torque wrench
Parts and consumables:
- Dye
- Brake discs
- Bearing grease
- Wheel bolts
Examination
1. Mark with paint the position of the wheels relative to the hubs. This will allow the assembly to install the balanced wheels in their original position. Loosen the wheel bolts before jacking up the vehicle. Raise the car, put it on stands and remove the wheels.
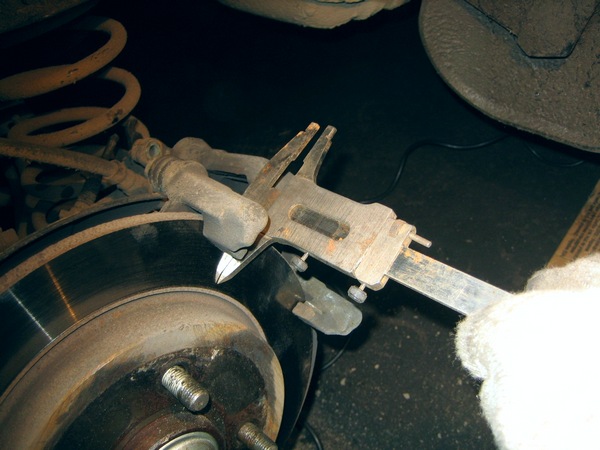
2. Measure the brake disc thickness at the thinnest point. Service stations use a special caliper for this, for example, HAZET 4956-1 or a micrometer bracket, because the disc has an edge due to wear.
Notes:
The thickness of the brake disc can also be measured using a conventional caliper, for which it is necessary to place spacers of the appropriate thickness on both sides of the disc (for example, two coins). The thickness of the disc in this case is equal to the value obtained minus the thickness of the gaskets.
3. The dimensions of the brake disc are given in the Specifications.
4. If the wear limit is reached, the brake disc must be replaced.
5. If there are large cracks or grooves deeper than 0.5mm, the brake disc must be replaced.
Notes:
Ventilated brake discs with hairline cracks up to 25 mm long do not need to be replaced.
6. Reinstall the wheels so that the marks made during removal match. Pre-lubricate with a thin layer of bearing grease the centering belt of the wheel disk on the hub. Do not grease wheel bolts. Replace rusty bolts. Wrap bolts. Lower the car onto the wheels and tighten the bolts crosswise to 110Nm.
The article is missing:
- Tool photo
- Photo of parts and consumables
- High-quality repair photos
Source: http://www.auto-knigi.com/model/mb_c/11_7/
![W203/S203/CL203 [2000 - 2004]](/uploads/mercedes-c-klass-w203.jpg)
