![1 generation [2007 - 2010]](/uploads/Nissan_Qashqai_2007-2010_.jpg)

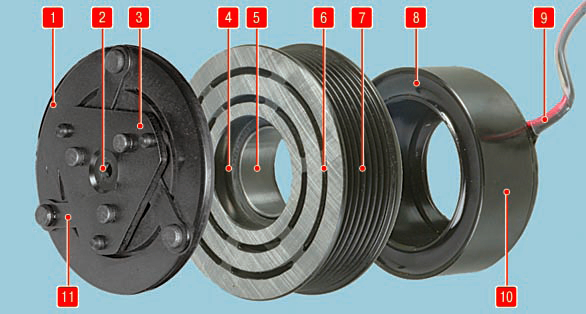
Rice. 12.8. Compressor drive electromagnetic clutch: 1 - clutch pressure plate; 2 - slotted hole of the disc hub; 3 - clutch driven disk; 4 - bearing; 5 - inner race of the bearing; 6 - working surface of the pulley; 7 - pulley streams; 8 – electromagnet winding; 9 - solenoid wiring harness; 10 - body of the electromagnet; 11 - elastic steel leash.
The air conditioner compressor is a rather complex, high-tech unit. Some compressor pump assemblies are manufactured using selective assembly, so component manufacturers do not retail parts for compressor pump repairs. The only repairable compressor unit in garage conditions is the electromagnetic drive clutch (Fig. 12.8).
When operating a car, compressor clutch failure is a very common malfunction. As a rule, the bearing 4 of the pulley begins to collapse first.
The cause may be incorrect tension of the drive belt, water ingress when driving through a deep puddle, slippage of the pressure plate 1 and, consequently, overheating of the bearing, etc. As the bearing deteriorates, pulley play begins to appear. When the backlash reaches a critical value, the inner surface of the pulley during rotation begins to rub against the surface of the body 10 of the electromagnet coil.
As a result of friction, the parts heat up, and the insulation of the winding 8 of the coil begins to burn out. An electrical short occurs and the electromagnet fails. In the most advanced cases, the bearing jams and the inner race 5 of the bearing rotates on the landing neck of the compressor cover. After that, the compressor has to be replaced, and this is a very expensive repair in specialized services.
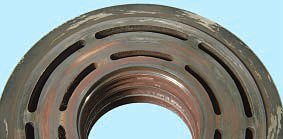
In order not to expose yourself to unnecessary expenses, when inspecting the car, pay attention to uncharacteristic noises during the operation of the air conditioning compressor. If you suspect a problem with the pulley bearing, remove the drive belt and turn the pulley by hand.
It should rotate on the bearing evenly, silently, without jamming. There must be no axial and radial play.
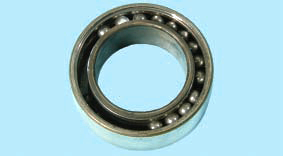
If necessary, replace the bearing without waiting for its complete destruction.
You will need: socket heads "for 10", "for 13", a screwdriver with a flat blade.
1. Remove the refrigerant from the air conditioning system.
2. Disconnect a wire from the minus plug of the storage battery.
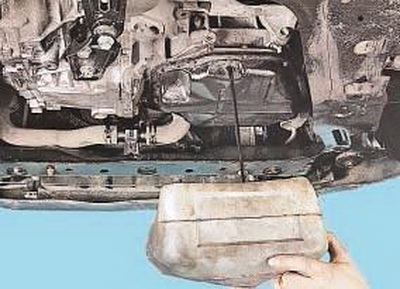
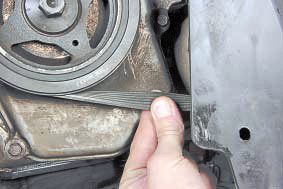
3. Remove the accessory drive belt (shown on the removed engine for clarity).
4. Check the condition of the drive belt.
NOTE.
Replace the belt if during the inspection you find: - signs of wear on the toothed surface, cracks, undercuts, folds or delamination of the fabric from the rubber; – cracks, folds, depressions or bulges on the outer surface of the belt; – loosening or delamination on the end surfaces of the belt; – Traces of oil on the surface of the belt.
WARNING.
A belt with traces of engine oil on any of its surfaces must be replaced, as oil quickly destroys rubber. The cause of oil getting on the belt (usually due to a violation of the tightness of the engine shaft seals) must be eliminated immediately.
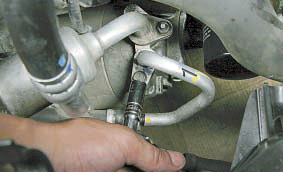
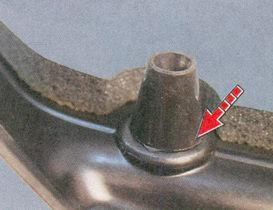
5. Turn out a bolt of fastening of a flange of the pipeline of a high pressure to the conditioner compressor …
NOTE.

This is how the bolt and nut fastening the flanges of the high and low pressure pipelines to the air conditioning compressor are located.
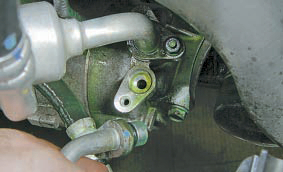
6. ... and move the pipeline to the side.
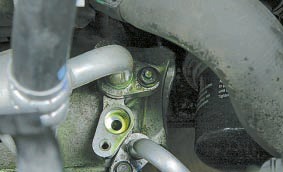
7. Turn off a nut of fastening of a flange of the pipeline of low pressure to the conditioner compressor …
8. ... and move the pipeline to the side.
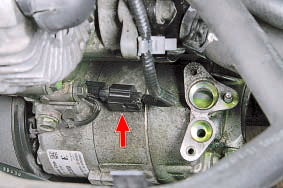
9. Press the retainer of the wiring harness block of the electromagnetic clutch for turning on the compressor ...
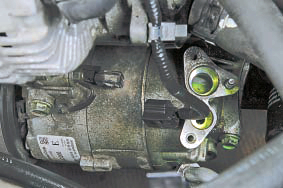
10. ... and disconnect the block from the connector.
NOTE.
For clarity, the following operations are shown on the removed engine.

11. Immediately after disconnecting, plug the compressor and air conditioning piping openings to prevent moisture and dirt from entering the air conditioning system.

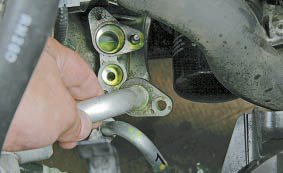
12. Turn out three bolts of fastening of the compressor to an arm on the block of cylinders.
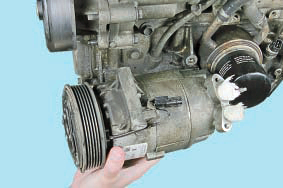
13. Remove the bolts from the mounting holes and remove the A/C compressor by lifting it up.
14. Install the compressor and all removed parts in the reverse order of removal.
WARNINGS.
Technological plugs of the flanges of a new compressor should only be opened immediately before connecting the pipelines.
When installing new pipe flange O-rings, be sure to lubricate them with A/C compressor oil.
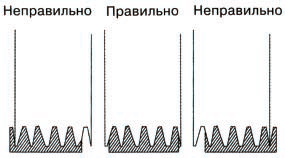
15. Make sure that when installing the drive belt, the wedge tracks coincide with the pulley streams ...
16. ... and the belt tension is correct.
17. Charge the A/C system with refrigerant at a specialized automotive air conditioner service center.
USEFUL ADVICE.
When buying a new compressor, check with the seller the amount and type of oil poured into the new compressor. This information may be useful to mechanics who later charge the system with refrigerant.