So, having gone through all the options, I settled on this. I think it is the most practical and looks solid.
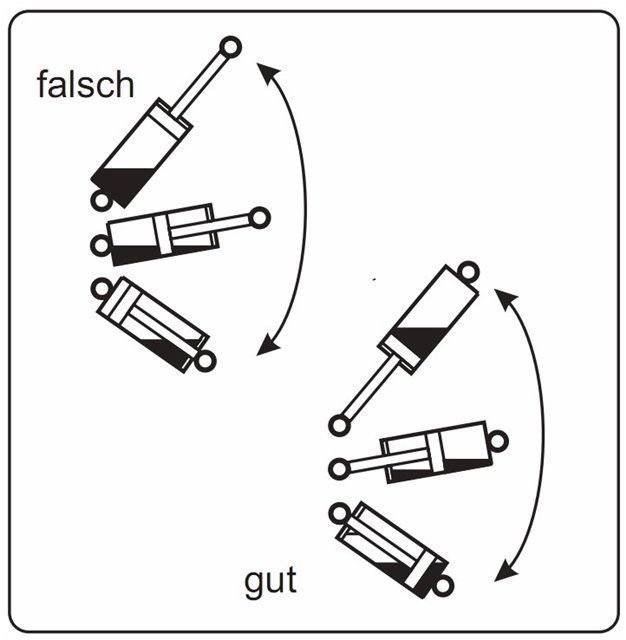
Searched the net, read from the Germans. I figured out (at least I myself) how to properly install the springs.
So, flask up, stem down.

First, you need the springs themselves, that's what they are called, and not shock absorbers, so that there is something to jump from.
You need to figure out that there is enough space for the springs themselves. We need the folded size (accurate, ball to ball). If there are old ones that do not hold well from the trunk (hatch or combi), you can also farm them. Kill two rabbits.
If there are no old ones, then you will have to figure it out by typing, put something similar in size.
We will dance from the bolt on the rack, measure, see how much free space we have.
In principle, this is the size of the rack, well, leave a little margin.


I bought with VW-3 Variant, length 585mm, closed 335mm, travel 250mm, force 360 N. Price 23.50 €, for 2 pieces (new).
They fit perfectly, better and not necessary. Maybe a little weaker, but not more powerful.
We take the corners, saw, drill (thickness 5 mm.) I cut the thread on m8, screwed it in, sawed off the excess and rolled it, you can drop it by welding or screw the nut if it doesn’t interfere.
I do not write sizes, as they are arbitrary.


Threaded balls (kugelzapfen) here you are. I made it myself, you can buy it.

This is the upper blank: The size is arbitrary, the thread is m8.
We screw in the ball, you can roll it, or you can do nothing, I’ll explain below.
Everything is sanded and painted. I zinc coated, then painted black (with spray cans).
And yet, when I screwed it on, I applied a composite mass to the places of contact with the hood. Type of cold welding. Looked at Toyota.

We have everything ready for assembly, we begin the calculation;
We need the exact size of the rack, when folded (ball to ball).
If you do not know it, then squeeze the rack to the end, and measure, let someone help you, 360N is difficult to measure alone.
So, we have the exact size, in my case 335mm. Let's add 1 cm. tolerance, it turned out 445mm. We need this so that the rack develops without problems.
We take a tape measure or a folding ruler, and measure from the corner on the rack (from the center of the ball) 445mm.
We mark, with a simple pencil, we put a mark on the upper part of the wing so that it can be seen with the hood closed, naturally observing all the parallels.
We close the hood, and mark on the hood, put a mark, this will be the fulcrum.

We start the assembly;
Tool: Screwdriver, socket 16, I think. Screwdriver. I have the emergency suitcases.

Since the metal on the hood is thin, good self-tapping screws are needed.
Box of self-tapping screws, galvanized, see size. There are no screws in the photo!

Under the corner, it is advisable to put a toothed washer so that it does not scroll, but an engraver under the nut.

We fasten the upper bracket, drill with a drill for 2, very carefully so that at the exit of the drill, do not cut off the upper part of the hood.
Since I have technological holes just in this place (there is an assumption that it is for these things), everything will be much simpler.
I also drilled an 8mm hole. in the center, under the remnants of the thread from the ball joint, you can put a washer and nut for reliability.

I think Tech. holes, you can drill yourself if they do not match. I have not installed nuts yet, on self-tapping screws with specials. washer / nuts, sits well, but the nut does not hurt.
Budget option: Bet on one side! Everything works too! 360N just right, with one rack, with two tight, but acceptable.
- source: http://www.primera-club.ru/f/baza-znaniy-tuning-p12/19508-ustanovka-amortizatorov-kapota/
Probably everyone guessed that we will talk about the gas stop of the hood, which is far from a common topic on our model. The convenience of this refinement is undeniable. Spectacular rise and smooth lowering add solidity. There is no need to constantly look for a hole in the hood, especially at night. The kit consists of: - fasteners number - 1

fixture number - 2

And the hydraulic stop itself.

final look

Not unimportant is the absence of any alterations and drilling in the car, which is important to me. To be honest, I put similar designs on almost all my cars. After the incident in the service, when the master, who dealt mainly with BMW and Mercedes, out of habit, with considerable effort, folded the hood for me almost in half using the R-10 as an example and apologized for a long time referring to my unusual cane support. After the repair at his expense, I replaced the prop with a gas stop.
- I would also like to add that all the elements can be made without much difficulty on their own, then picking up the gas stop of the desired length and effort.
Source: https://www.drive.net/l/235674/#post


![P12 [2001 - 2008]](/uploads/Nissan_Primera_Primera_1.9_DCi_Sedan.jpg)