![1 generation [2012 - 2015]](/uploads/Citroen_Jumper_2002_-_2006_.jpg)

Tool:
- Belt Tensioner Lever
- torque wrench
- Tension gauge
Parts and consumables:
- Timing belt (0816.68)
Notes:
This timing belt installation guide also applies to Fiat Ducato and Peugeot Boxer vehicles with the same engine.
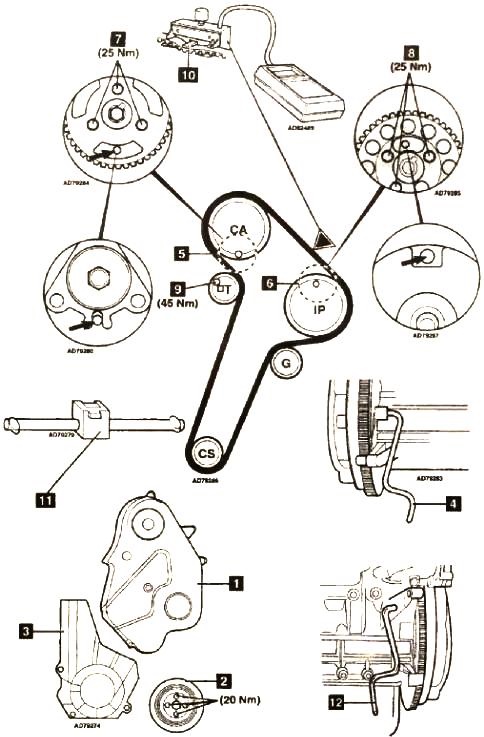
Timing belt installation diagram
1. Put on a belt counterclockwise since a cranked shaft.

Timing Belt Citroen Jumper
Note:
If necessary, tighten the toothed pulley until the nearest tooth matches the belt recess.
2. Install the tension gauge (10) on the belt in the place shown by the arrow.
3. Install the tensioner lever (11) into the square of the tensioner.
4. Tension the belt to 107 SEEM. Tighten the nut (9) to 45 Nm.
5. Remove the tension gauge.
6. Tighten the bolts (7) and (8) fastening the camshaft pulleys and high pressure fuel pump to 10 Nm, then tighten them to 25 Nm.
7. Remove pins (4) or (12), (5) and (6).
8. Turn the crankshaft clockwise to install the flywheel pin.
Warning:
It is forbidden to rotate the crankshaft counterclockwise.
9. Install the flywheel pin.
10. Loosen the bolts (7) and (8) of the camshaft and injection pump sprocket. Tighten the bolts by hand.
11. Loosen tensioner nut to relieve belt tension.
12. Install pins (5) and (6) in toothed pulleys.
Note:
If necessary, you can turn the toothed pulleys with a wrench.
13. Install tensioner lever (11) and tension belt to 58 SEEM. Tighten the nut (9) to 45 Nm.
14. Tighten the mounting bolts (7) and (8) to 10 Nm, then tighten to 25 Nm.
15. Remove locking pins (4) or (12). (5) and (6). And turn the crankshaft clockwise 2 turns.
16. Check the possibility of free installation of the pin (4) or (12), (5) and (6).
17. Check and adjust the injection advance angle.
18. Install the crankshaft pulley (2). Tighten the mounting bolts to a torque of 20 Nm.
The article is missing:
- Tool photo
- High-quality repair photos
Source: carpedia.club