![E140/E150 [2006 - 2010]](/uploads/Toyota_Corolla_E140_2006_-_2010_.jpg)

Tools:
- Screwdriver with a long blade
Parts and consumables:
- Sheet of thick white paper approximately 2 m
- Roulette
- Chalk or marker
Note:
The reason for the direction of the headlight beam may be incorrect installation of the lamp. Therefore, before making adjustments, you should check the installation of the lamp.
Preparing the car for the procedure for adjusting the headlights of the Toyota Corolla
1. Make sure that there is no damage or deformation of the body near the headlights.
2. Fill up the fuel tank.
3. Make sure the oil is filled to the specified level.
4. Make sure the coolant is filled to the specified level.
5. Inflate tires until the correct pressure is reached.
6. Unload the luggage compartment and the car. Make sure the spare wheel, tools and jack are in their original positions.
7. The driver's seat must be occupied by a person of average weight (75 kg, 165 lbs).
8. For cars with adjustable height suspension, before adjusting the Toyota Corolla headlights, you should set the minimum height of the suspension.
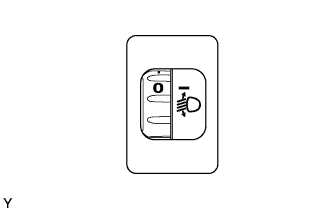
9. Vehicles with manual headlight adjustment should be set to "0".
Preparing the car for adjusting the headlights of the Toyota Corolla
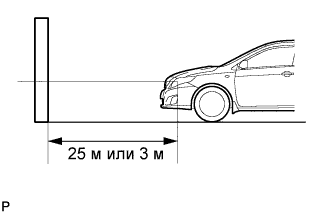
1. Install the car in the following position:
2. Position the vehicle in a place that is dark enough so that you can clearly see the boundary line. The boundary line is the line below which headlights can be observed and above which they cannot.
3. Position the vehicle at a 90° angle to the wall.
4. Position the vehicle so that the distance between it (the center of the headlight bulb) and the wall is 25 m (82 ft).
5. Make sure the car is on a level surface.
6. Shaking the car up and down, stabilize the suspension.
NOTE:
To properly adjust the headlights on a Toyota Corolla , the distance between the vehicle (center of the headlight bulb) and the wall must be 25 m (82 ft). If there is not enough space, the headlights should be checked and adjusted exactly 3 m (9.84 ft) away. (The size of the target area changes depending on the distance, so follow the directions in the illustration.)
7. Prepare a sheet of thick white paper (approximately 2 m (6.6 ft) (length) x 4 m (13.1 ft) (width)) to use as a screen.
8. Draw a vertical line through the center of the screen.
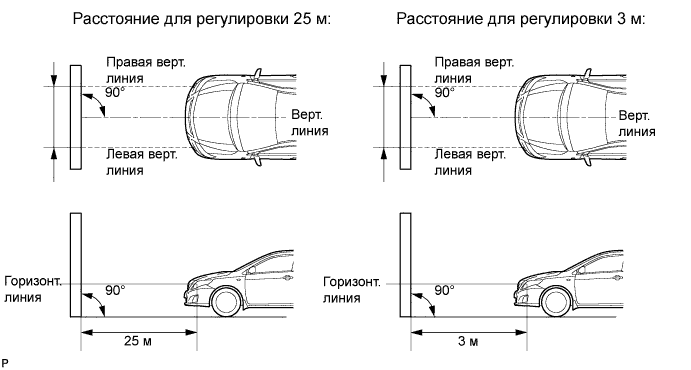
9. Install the screen as shown.
NOTE:
Position the screen perpendicular to the ground.
10. Align the vertical line on the screen with the central axis of the vehicle.
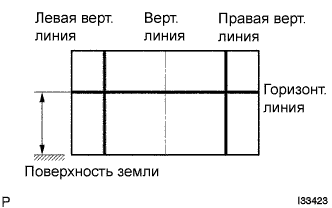
11. Draw the main axes (horizontal, right and left vertical lines) on the screen as shown in the figure.
NOTE:
The centerlines for the low beam test and the high beam test are different.
12. Put on the screen the center marks of the headlight bulbs. If the headlights do not show center marks, use the center of the headlamp bulb or the manufacturer's name marked on the headlamp as the center mark.
Horizontal line (headlight height):
13. Draw a horizontal line on the screen so that it passes through the center marks. The horizontal line must be at the same height as the center marks of the dipped beam headlights.
14. Left and right vertical lines (to mark the center points of the left and right headlights).
15. Draw two vertical lines so that they intersect the horizontal line at the center marks (coincide with the centers of the dipped beam headlamps).
Toyota Corolla Headlight Direction Check
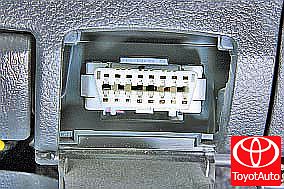
1. Cover the headlight on the opposite side or disconnect its connector so that the light from the headlamp that is not being tested does not interfere with the headlight direction test.
WARNING:
Do not disconnect the high voltage connector of the discharge lamp when performing this light direction test.
Do not leave the headlight closed for more than 3 minutes. The headlight lenses are made of synthetic plastic and can be easily melted or damaged by excessive heat.
When checking the high beam direction, cover the low beam headlights or disconnect the connector .
2. Start the engine.
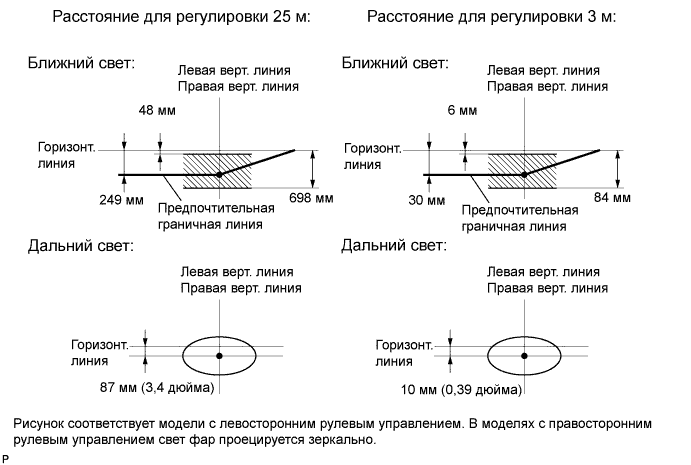
3. Turn on the headlights and check if the boundary line is the same as the preferred boundary line shown in the following figure.
NOTE:
Since the dipped beam headlights and high beam headlights are one unit, if the dipped beam headlights are adjusted correctly, the high beam headlights must also be adjusted correctly. However, to be sure, both beams should be checked.
If the adjustment distance is 25 m (82 ft): the boundary line of the low beam must be 48 to 698 mm (1.9 to 27.5 inches) below the horizontal line.
If the adjustment distance is 3 m (9.84 ft): the boundary line of the dipped beam must be 6 to 84 mm (0.2 to 3.3 in) below the horizontal line.
If the adjustment distance is 25 m (82 ft): the preferred dipped beam limit line is 249 mm (9.8 in) below the horizontal line.
If the adjustment distance is 3 m (9.84 ft): The preferred dipped beam limit line is 30 mm (1.2 in) below the horizontal line.
Adjusting the direction of headlights Toyota Corolla
Vertical Direction Adjustment:
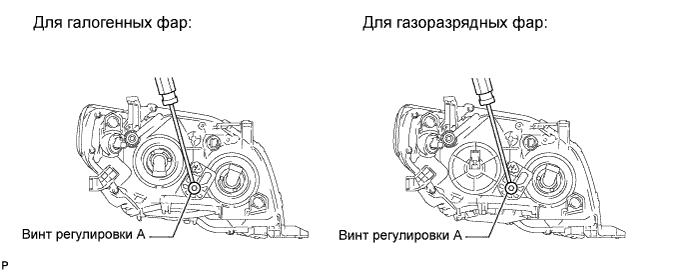
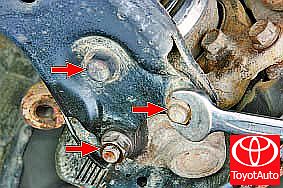
Using a screwdriver, adjust the beam direction of each headlight according to the specified range using adjustment screw A.
NOTE:
At the final stage, the headlight adjustment screw should be turned clockwise. If the screw is turned excessively, loosen and tighten it again so that the final step is to turn the screw clockwise.
NOTE:
Since the dipped beam headlights and high beam headlights are one unit, if the dipped beam headlights are adjusted correctly, the high beam headlights must also be adjusted correctly. However, both beams should be tested to be sure.
If the headlights cannot be adjusted correctly, check the installation of the bulbs, headlight assemblies, and headlight reflectors.
Turning the adjusting screw clockwise moves the headlight direction upwards, turning the screw counterclockwise moves it downwards.
Horizontal Direction Adjustment:
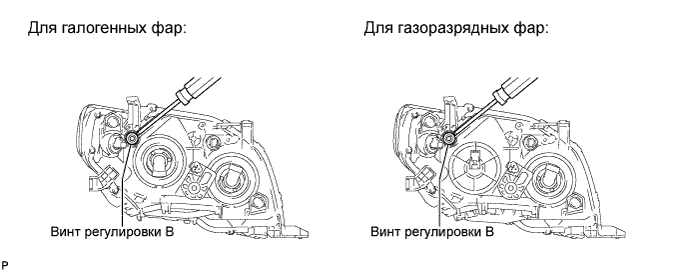
Using a screwdriver, adjust the beam direction of each headlight according to the specified range using adjustment screw B.
NOTE:
At the final stage, the headlight adjustment screw should be turned clockwise. If the screw is over-tightened, loosen it and tighten it again so that the final step is to turn the screw clockwise.
NOTE:
The dipped and main beam headlights are single blocks. Correct adjustment of the dipped beam direction should result in the correct setting of the high beam direction.
If the headlights cannot be adjusted correctly, check the installation of the bulbs, headlight assemblies, and headlight reflectors.
Source: http://techdoc0608.corolla.su/rm04f1ru/repair2/html/frame_rm0000011mi01bx.html