![W203/S203/CL203 [2000 - 2004]](/uploads/mercedes-c-klass-w203.jpg)

Instruments:
- torque wrench
Parts and consumables:
- Insulating tape
station wagon
Withdrawal
1. Wet the rear window with water.
2. Run the wiper for a short time and stop it with the switch. Thus the cleaner comes to an extreme position.
3. Mark the position of the brush with correctly adjusted levers on the glass, eg with adhesive tape.
4. Fold back the cap and unscrew the nut.
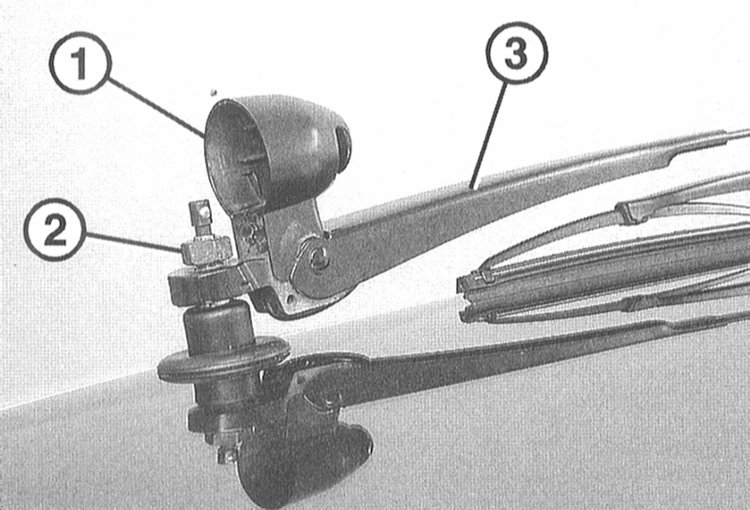
1 - cap;
2 - nut;
3 - lever.
5. Fold out the lever and remove it.
Note:
At the same time, do not damage the jet inserted into the axis of the cleaner.
Installation
1. Make sure the wiper motor is in the end position. If necessary, start the motor for a short time and stop with the switch.
2. Establish the screen wiper arm on an axis and expose on the mark put by an adhesive tape at removal.
3. Screw on the nut.
4. Check the end position of the levers again. To do this, close the hood, moisten the glass with water and run the wiper for a short time. The levers should return to their set position and should not extend beyond the glass when cleaning the glass.
5. If necessary, loosen the nuts again and repeat the adjustment.
6. Tighten the nut with a torque of 12Nm and put on the cap.
The article is missing:
- Tool photo
- Photo of parts and consumables
- High-quality repair photos
Source: http://www.auto-knigi.com/model/mb_c/13_1_10/