Tool:
- Torx wrench
- Locking pin
Parts and consumables:
- Pulley
- Stretching device
- V-belt 6x2415
Diesel engines with air conditioning

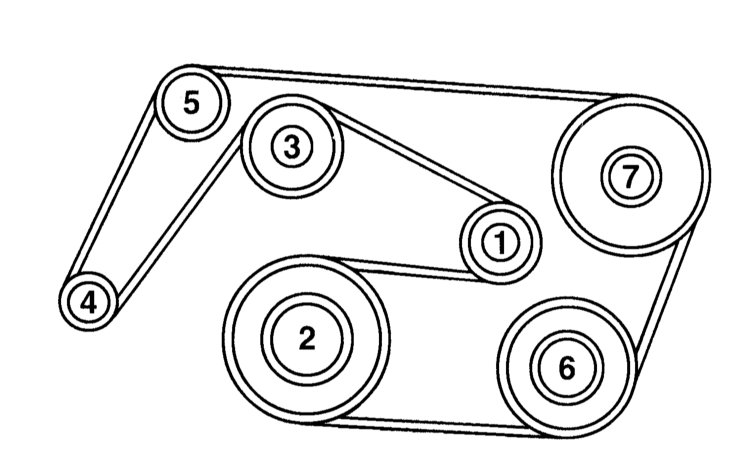
V-belt laying diagram:
1 - tension roller
2 - crankshaft
3 - coolant pump
4 - generator
5 - deflecting roller
6 - compressor
7 - power steering pump
Withdrawal
1. Turn the tensioner with the Torx head counterclockwise, thus loosening the V-belt.
2. Lock the tensioner in this position. To do this, insert a pin through the holes in the front part and tensioner housing. The finger can be made independently from a bar. Dimensions: length approx. 50 mm, diameter = 4 mm.
3. Remove the V-belt.
Notes:
When carrying out further work on the engine or the distributor housing cover, the tensioner must be loosened.
Check
1. Check the pulley grooves for damage and dirt, clean or replace the pulley if necessary. At the same time, pay attention to the wear of the tensioner supports and to the defects of the pulley.
2. If the supports are worn, the tensioner must be replaced.
3. A V-belt with dirt inclusions between the ribs, loose ribs, fraying, transverse cracks and broken ribs must be replaced.
Installation
1. Put on the V-belt, starting with the tension roller.
2. Slightly turn the tensioner counterclockwise, thus loosening the locking pin.
3. Remove the lock pin.
4. Turn the front part of the tensioner slowly with a wrench clockwise and thus tension the V-belt.
Notes:
Tension the belt slowly, do not release the tensioner.
The article is missing:
- Tool photo
- Photo of parts and consumables
- High-quality repair photos
Source: http://auto-knigi.com/model/mb_c/4_6_11/
![W203/S203/CL203 [2000 - 2004]](/uploads/mercedes-c-klass-w203.jpg)
