![B6 [2000 - 2005]](/uploads/Audi_A4_2000-2005_B6_.jpg)

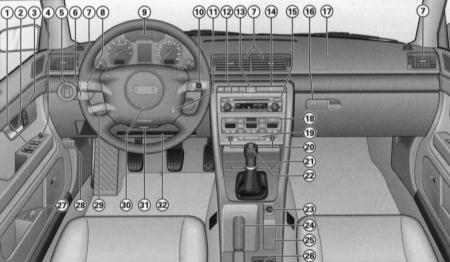
- Electric windows
- Door handle
- Locking system switch with single control
- Electrically adjustable exterior mirrors
- Light switch/switch
- Headlight beam leveler - function of illumination of the road to the house / to the car
- Knurled Adjuster Deflectors
- Lever switch for direction indicators and high beam
- Dashboard
- Lever switch: wiper and washer, trip computer controls
- Egnition lock
- Depending on the configuration: pencil case, anti-skid switch (ESP), sunshade drive switch, acoustic park assist switch.
- Hazard light switch
- coaster
- Depending on equipment: radio, navigation system plus (navigation, radio, CD changer, TV/video).
- Lockable glove box
- Front passenger airbag
- Depending on the configuration: air conditioning, heating and ventilation
- Heated rear window switch
- Seat heating controller
- Ashtray
- Gear Lever/Selector: Manual Transmission, 5-Speed Automatic Transmission, Multitronic
- Cigarette lighter/socket
- Hand brake
- Depending on the configuration: niche, navigation system controls, menu display controls
- Depending on the configuration: compartment, niche for storing audio cassettes, connector for fax and computer
- Driver's seat memory keys
- Hood release handle
- Tempostat handle
- Steering wheel with: horn, driver airbag, radio controls, radio controls and telephone
- Adjustable steering column
- A niche for storing a folder with documents.
The location of some of the controls on right-hand drive vehicles differs from those shown in the illustration. However, the symbols used to represent them correspond to those of left-hand drive vehicles.
center console
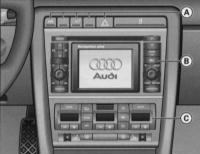
Driver's seat: center console
- A - Row of switches
- B - Audi navigation plus/audio system, e.g. Audi symphony
- C - Air conditioning and heated windows / seats
The location of some of the controls on right-hand drive vehicles differs from those shown in the illustration. However, the symbols used to represent them are those of left-hand drive vehicles.
If the vehicle is factory-equipped with the Audi navigation plus and the Audi symphony radio system, the respective operating instructions are supplied with them.
With the Audi navigation plus, radio, CD player and TV functions are integrated.
Dashboard
The dashboard serves as the information center of the car for the driver.
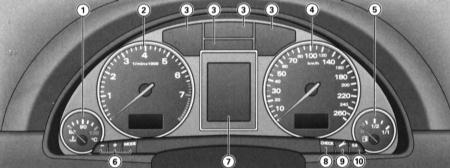
- 1. Coolant temperature gauge
- 2. Tachometer with digital clock and date display
- 3. Pilot lamps
- 4. Speedometer with counter and odometer display
- 5. Fuel gauge
- 6. Setting buttons
- - digital clock and date
- - instrument lighting
- 7. Display
- - indication of the period of maintenance
- - driver information system
- 8 .CHECK button
- 9 .Button for displaying the maintenance period
- 10. Odometer reset button
- When the ignition is on, the arrows on the dashboard are illuminated.
- When the light is on, the scales are additionally illuminated.
Coolant temperature gauge
The coolant temperature gauge only works when the ignition is on. To avoid damage to the engine, observe the following temperature guidelines.
Cold engine temperature range
If the arrow is still on the left side of the scale, this means that the engine has not yet reached operating temperature. Avoid high speeds, "full throttle" and heavy engine load.
Working temperature
The engine has reached operating temperature if, during normal driving, the temperature gauge pointer is within the middle part of the scale. With a significant engine load and high outside temperature, the arrow may move further to the right on the scale. This should not be a cause for alarm until the warning symbol lights up on the instrument panel display. 
The flashing of the warning symbol on the display indicates that the coolant level has dropped or is overheating, see Driver Information System (FIS).
One of the tasks of the front spoiler while driving is to properly distribute the cooling air. If the spoiler is damaged, the cooling effect is impaired and there is a risk of engine overheating! Get qualified help.
Tachometer
The tachometer shows the engine speed.
At a speed of less than 1500 rpm, you should switch to the next lower gear. The beginning of the red sector of the scale corresponds for all gears to the range of maximum revolutions that are allowed for a short time for a run-in and warm engine. It is necessary to switch to a higher gear, set the selector lever to the “D” position or slow down the gas until the arrow reaches this sector of the scale.
Digital clock with date display
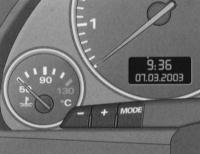
Fragment of the dashboard:
- - digital clock
- - indicator panel with a symbol for receiving radio clocks, time and date
- - instrument lighting control buttons
The car is equipped with a quartz clock or clock radio.
Clock setting
PROCEDURE
- Press the "MODE" button; the hour display flashes.
- The clock display is increased by pressing the "+" button.
- The clock display is reduced by pressing the "-" button.
Setting minutes
PROCEDURE
- Press the "MODE" button so often until the minute display starts flashing.
- The minutes display is increased by pressing the "+" button.
- The minute display is reduced by pressing the "-" button.
Setting the calendar date
PROCEDURE
- Press the "MODE" button so often until the day indication starts flashing.
- The day indication is set by pressing the "+" or "-" button.
- Press the "MODE" button again. The month display now flashes.
- The month indication is set by pressing the "+" or "-" button.
- Press the "MODE" button again. The year is now flashing.
- Year indication is set by pressing the "+" or "-" button
Switching off the calendar date
PROCEDURE
- Press the "MODE" button as often as necessary until the full display of the calendar date begins to flash.
- The date indication is removed by pressing the "-" button.
Calling a calendar date
PROCEDURE
- Press the "MODE" button as often as necessary until the full display of the calendar date begins to flash.
- The date indication is removed by pressing the "-" button.
When the display stops flashing after pressing the button, the setting process and programming of the time/calendar date are completed.
By pressing the SNESK button, with the ignition off, you can turn on the digital clock with date display and the mileage counter for a few seconds.
Radio-clocks
In the "radio-controlled quartz clock" mode, the symbol for receiving radio information appears on the indicator panel (radio tower with divergent waves). In this mode, it is not possible to manually change the indication of minutes and date.
In different time zones, you must manually change the clock display accordingly.
If there is no corresponding radio signal for three days, the watch automatically switches to the “quartz watch” mode. At the same time, the indication of the symbol for receiving radio information disappears.
Instrument lighting
PROCEDURE
- To increase the brightness of the background, press the "+" button.
- To decrease the background brightness, press the "-" button.
A phototransistor mounted in the dashboard regulates the lighting of the instruments (lighting the arrows and scales), the lighting of the center console and the lighting of the displays.
When the light is off and the ignition is on, the instruments (arrows and scales) are illuminated. As the brightness of the surrounding background decreases, the brightness of the instrument lighting is automatically reduced. When there is little ambient light, the lighting is switched off altogether. This function serves as a reminder to the driver to turn on the dipped beam in time when the brightness of the surrounding background decreases.
Speedometer, odometer and odometer
Speedometer
The speedometer shows the speed.
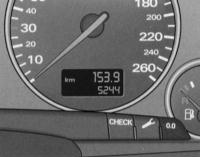
Dashboard fragment: counter and odometer, CHECK button. The mileage display is displayed in kilometers (km). In some modifications, the indication is displayed in miles.
Total mileage counter (located at the bottom)
Records the total mileage of the vehicle in kilometers or miles.
Mileage meter (located on top)
Records the mileage since it was last reset. It allows you to measure certain segments of the run. The division value of the meter is 100 m or 1/10 mile. Resetting (setting to zero) is done by pressing the reset button.
Fault indication
The presence of a malfunction in the dashboard is signaled by the indication "dEF" on the display of the mileage meter.
Fuel gauge
The indicator only works when the ignition is on.
If the arrow has reached the reserve field, the symbol lights up on the instrument panel display, see Driver Information System (FIS)  . This means that about 8-10 liters of fuel are left in stock. The indication of this symbol reminds you of the need for refueling.
SNESK button
Functional purpose of the SNESK button:
Enabling the indication of digital clock, counter and mileage meter
By pressing the SNESK button, with the ignition off, the digital clock display with date indication and mileage displays are switched on for a few seconds.
Enabling the Vehicle Fault Monitoring System (AutochekControl) Function
With the ignition on and while driving, the automatic fault monitoring system, see Driver Information System (FIS), continuously monitors certain functions and the technical condition of the vehicle's systems.
With the ignition on, the function of the fault monitoring system can also be turned on by pressing the SNESK button. Checking the operation of the system can be performed both with the engine turned off and with the engine running and at a speed of not more than 5 km / h.
Displaying instructions for the driver
If a symbol of the 1st priority level flashes on the display, see Driver Information System (FIS) or if an indication appears informing about a malfunction of the lamp function, see Driver Information System (FIS), by briefly pressing the CHESK button, you can turn on the lighting again appropriate instructions to the driver. For instance:
Motor abstellen, Olstand prufen (switch off the engine, check the oil level). The display indication goes out after about 5 seconds.
Speed alarm
By pressing the CNECK button while driving, the warning level threshold 1 of the overspeed warning device can be programmed, see Driver Information System (FIS), "Warning level 1: function". The warning level threshold 2* of the overspeed warning device, see Driver Information System (FIS), "Warning level 2: function" is only programmable when the ignition is switched off.
Maintenance interval indication
The service interval indicator reminds you of the next service.
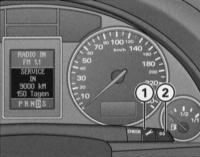
Fragment of the dashboard: indication of the period of maintenance.
Maintenance indication
By briefly pressing the button (1) with the ignition on, the display shows the number of kilometers until the upcoming maintenance. The indication output is possible both when the engine is turned off and when the engine is running and at a speed of not more than 5 km / h. The indication of the number of kilometers to maintenance is updated every time the ignition is switched on - the first time after 500 km after the reset. The message SERVICE IN——-KM—-TAGEN will be displayed on the display of the new vehicle/vehicle after maintenance during the first 500 km.
This also applies to vehicles with "LongLifeservice".
Maintenance Reminder
When there are 2000 or less kilometers left before the upcoming maintenance, when the ignition is turned on, the display shows:
SERVICE IN 2000 km—TAGEN
After 5 seconds, the display switches to normal display mode. The indication of the number of kilometers to service is updated each time the ignition is switched on, until the due date for the service.
Maintenance due date
When the due date for the next maintenance is due, immediately after the ignition is switched on, the indication “SERVICE!” is displayed on the display. After 5 seconds, the display switches to normal display mode.
Reset to the position of the new indication countdown
Switch off the ignition.
With the button (1) pressed, turn on the ignition. One of two messages appears on the display: "SERVICE IN——-KM" or "SERVICE".
Press the reset button (2) until the display shows "SERVICE IN——-KM—-TAGEN" or "SERVICE!".
If you do not press the reset button within 5 seconds, the display will return to the normal display.
When the battery is disconnected, the service interval display data is retained.
If a 1st priority fault (red symbol) is present, the service kilometers display cannot be called up.
Reset button
The reset button "0.0", (2) has the following function:
Resetting the mileage meter
Setting the zero value of the mileage meter (upper) is carried out by pressing the reset button.
New countdown of the maintenance interval display
It is done by pressing the reset button. In this case, the maintenance interval display must be in reset mode.
Pilot lamps
Control lamps of the dashboard
The indicator lamps indicate the status of certain functions/faults.
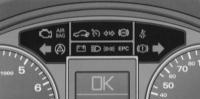
Dashboard: control lamps
 Engine electronics
AIR
BAG
Security systems
 Electronic anti-theft lock
 Tempostat
 Trailer direction indicators
 Anti-Lock Brake Device (ABS)
 Seat
Seat
belt reminder
 Left turn signal
 Anti-skid system (ESP)
 Battery discharge
 high beam
 parking lights
EPC
Engine management
 Preheat system
 Brake system malfunction,
handbrake applied
 Right direction indicator
Engine electronics 
The control lamp  indicates a malfunction of the engine electronics. Diagnose and correct the cause of the problem immediately.
AIR BAG security systems
The control lamp monitors the operation of the airbags and belt tensioners.
The AIR BAG warning lamp lights up for a few seconds when the ignition is switched on.
The system is malfunctioning if the AIR BAG warning lamp does not go out after the ignition is turned on or lights up, flashes while driving, and also does not light up when the ignition is turned on.
Electronic anti-theft lock 
The warning lamp indicates communication between the vehicle and the original ignition key.
When the ignition is switched on, the vehicle key data is automatically requested. A positive result of the data exchange is confirmed by a short ignition of the control lamp  .
.
When using a non-original key, the control lamp starts flashing for a long time. In this case, the vehicle cannot be operated.
Tempostat 
The control lamp  in the dashboard lights up when the tempostat is operating.
Trailer direction indicators 
When driving with a trailer, the control lamp flashes together with the turn indicators on.
The control lamp  flashes when the direction indicators are switched on, if the trailer is correctly connected to the vehicle.
In the event of a malfunction of the direction indicator lamp on the vehicle itself or on the trailer, the control lamp does not flash.
Anti-Lock Braking System (ABS) 
The warning light monitors the function of the ABS and Electronic Differential Lock (EDS).
The control lamp  lights up for a few seconds when the ignition is switched on/during engine start and should go out after the end of the automatic control process.
The ABS device is faulty if:
- The control lamp does not light up when the ignition is switched on.
- The control lamp does not go out after a few seconds.
- The control lamp lights up while driving.
In this case, the vehicle can only be braked using the conventional braking system, i.e. without ABS. Contact a service station immediately. Learn more about ABS.
In the event of a fault in the ABS, the ESP warning lamp lights up.
Malfunction of the entire brake system
If the ABS warning lamp  lights up together with the brake system warning lamp
  (when the hand brake is released), then in this case, not only the ABS control function fails, but also the brake system malfunctions.
In the event of a malfunction of the brake system, the symbol appears on the instrument panel display  . Observe the information given in the "Brake system malfunction" section
  .
.
Malfunction of the electronic differential lock (EDS) device
The EDS device works in conjunction with the ABS. The failure of the EDS device is signaled by the ignition of the ABS warning lamp  . Contact a service station immediately. Learn more about EDS.
Reminder to buckle up 
The control lamp reminds you of an unfastened seat belt.
The control lamp  lights up for a few seconds after the ignition is switched on.
Learn more about seat belts.
direction indicators 
The control lamp flashes together with the included direction indicators.
Depending on the included turn indicators, the left  or right
  control lamp flashes. When the hazard warning light is on, both control lamps of the direction indicators flash simultaneously.
If one of the direction indicators fails, the control lamp flashes twice as often.
This does not apply to driving with a trailer. If any of the direction indicator lamps on the vehicle itself or on the trailer fails, the indicator lamp does not flash. Learn more about turn signals.
Battery discharge 
The control lamp signals a defect in the generator or a malfunction in the vehicle's electrical equipment.
The control lamp  lights up for a few seconds when the ignition is turned on, to demonstrate its performance and should go out after starting the engine.
If the lamp  lights up while the car is moving, then, as a rule, you can still drive to the nearest service station. Since, however, a continuous discharge of the battery occurs, all but the most necessary current consumers should be switched off.
high beam 
The control lamp lights up when the high beam is on.
The control lamp  lights up at inclusion of a high beam or at use of an intermittent light signal.
More details about high beam.
parking lights 
The control lamp burns at the included parking fires.
The control lamp  burns at the included parking fires.
Brake system 
The warning lamp flashes when the brake fluid level is too low, the ABS device malfunctions, or when the hand brake is applied.
If the warning lamp flashes  (when the hand brake is released), stop and check the brake fluid level.
If the ABS fails, the ABS warning lamp  comes on together with the brake system warning lamp
  .
.
Tightened hand brake
The control lamp  burns also at the tightened manual brake. In addition, when driving for more than 3 seconds at a speed above 5 km / h, a buzzer sounds and an alarm indication is displayed on the display.
Vehicles with ESP
Electronic anti-skid system (ESP) 
The control lamp monitors the function of the electronic anti-skid system.
Pilot lamp functions:
The lamp flashes while driving when the ESP device is operating.
The lamp comes on to check the function when the ignition is switched on and should go out after about 2 seconds.
The lamp is on when the ESP is malfunctioning.
The lamp is on after disconnecting and then reconnecting the battery.
The lamp is on when the ESP device is off.
The lamp is also on when the ESP fails, since the ESP device works together with the ABS.
If the warning light comes on immediately after starting the engine, a system-controlled ESP shutdown may occur. In this case, you can turn on the ESP by turning the ignition off and then on. The lamp goes out and the device is completely ready for operation.
If the battery is disconnected and then reconnected, the control lamp lights up after the ignition is switched on. For the lamp to go out, a short movement in a straight line is enough.
Learn more about ESP.
Cars with a gasoline engine
EPC engine power control
The control lamp monitors the engine management system.
The EPC (Electronic Power Control) warning lamp lights up for a few seconds when the ignition is turned on to demonstrate its performance.
Diesel vehicles
Preheat system
The ignition of the control lamp indicates the preheating of the engine. Start the engine as soon as the lamp goes out. When starting a warm engine, as well as when the outside temperature is above +8°C, the control lamp lights up for about 1 second.
The reason that the control lamp does not light up at all when the ignition is turned on may be a malfunction in the preheating system. The engine needs to be checked.
Retrieved from http://carmanz.com/audi/a4-b6-2000-2004/6437-a420000-10-1.html