![P12 [2001 - 2008]](/uploads/Nissan_Primera_Primera_1.9_DCi_Sedan.jpg)

Tools:
- Nozzle on the crank 30 mm
- Pivot puller
- Drive shaft puller
- Wheel wrench
- Bench vise
- Bearing puller
- Large flat screwdriver
- punch
- Wooden mallet
- Small hammer
- brass rod
Parts and consumables:
- Drive shaft assembly
- shaft cover
- Case clips
- Crosspiece assembly
- Hinge assembly
- Frame
- Thrust bearing
- Insulating tape
- Nissan branded lubricant
- Clamps
- Chalk or marker
- rags
Withdrawal
1. Remove the cotter pin. Loosen the locknuts and remove the washers with the hub nut wrench.
2. Remove the ABS wheel sensor from the steering knuckle.
3. Remove the tie rod from the steering knuckle with a steering arm puller.
4. Remove the lock plate from the rack. Disconnect the brake hose from the rack.
5. Turn off a fixing bolt of a rotary fist of a rack.
Notes:
Do not bend the drive shaft joint more than 22°. Fix the steering knuckle securely so as not to overstretch the sliding joint.
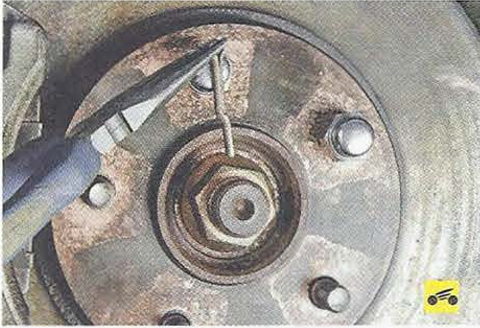
6. Take out a power shaft from a rotary fist by means of a stripper. On vehicles with a thrust bearing, remove the mounting bolts from the thrust bearing bracket and remove the right drive shaft thrust bearing.
7. Disconnect the drive shaft from the transmission using a wheel wrench or other tool.
Notes:
When removing the drive shaft from the vehicle, be careful not to touch the brake hose, ABS wheel sensor harness, or other parts with it. Do not bend the hinge more than 22°. Also, do not overstretch the sliding joint. Do not lift the drive shaft with the axle shaft fixed by grasping only the intermediate shaft. Do not allow the drive shaft inserted into the gearbox to hang down without the countershaft support, wheel pivots and other components.
8. Remove the fixing bolt from the support bearing bracket, right drive shaft. Then remove the bracket from the engine.
Check after removal
1. Move the hinge up/down, left/right and axially. Make sure the movement is smooth and there is no significant play. Check for cracks and damage on the covers, and for leaks of grease.
Disassembly
1. Remove the boot clip. Secure the shaft in a bench vise. Apply alignment marks to the shaft and spider assembly.

2. Remove the retaining ring. Remove the cross assembly from the shaft.
3. Remove the cover from the shaft.
4. Remove the dynamic damper from the shaft.
5. From the wheel side, remove the sensor disk from the drive shaft using a bearing puller and puller.
Notes:
With the exception of the sensor disc, this component cannot be disassembled.
6. Secure the shaft in a vise.
7. Remove the clips from the covers.
8. Then remove the boots from the hinge assembly.
9. Screw the drive shaft puller onto the threads of the pivot assembly by at least 30 mm.
10. Then remove the hinge assembly from the shaft.
Notes:
If the pivot assembly does not come off even after several attempts, replace the entire drive shaft assembly.
11. Remove the boot from the shaft.
12. Remove the dynamic damper from the shaft.
13. Remove the ring clamp from the shaft.
14. Wipe off old grease.
15. Remove the boot from the shaft using a brass rod and a flat-bladed screwdriver.
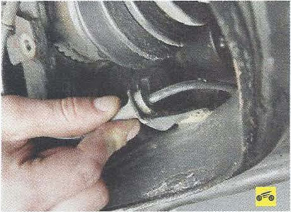
16. Remove the circlip from the housing.
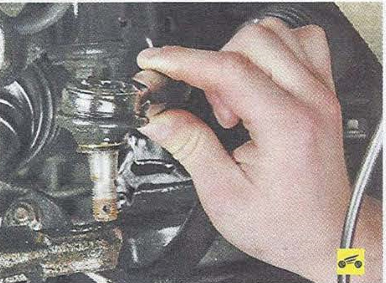
17. Press the thrust bearing assembly out of the housing.
18. Remove the circlip from the thrust bearing housing. Then, using a drift, press the thrust bearing out of the housing.
Check after disassembly
1. If runout, cracks or damage is found, replace the shaft.
2. If cracks are found, replace the boot. On the wheel side, the boot must be replaced together with the drive shaft assembly. If removed, the clips of the covers should be replaced with new ones.
3. If the roller contact surface on the body or spider side is scratched or worn, replace the body and spider assembly. If the cross rollers have peripheral play or jerky rotation, replace the cross assembly.
4. At detection of deviations of components of the hinge in gathering from norm, replace the hinge in gathering. In the case of replacing the body, the cross and the hinge are changed as a set. The cross roller is stamped with a number corresponding to the part number in the catalog - select a suitable replacement part with the same number.
5. Check that the thrust bearing is not damaged or excessively worn and that the thrust bearing housing is not cracked or damaged.
Assembly
1. Wrap the spline of the drive shaft with electrical tape. Place the clip on the boot and the boot on the shaft. Do not damage the case.
2. Remove the tape wrapped around the shaft spline. Align the marks made when removing the cross. Install the cross assembly with the spline chamfer facing the drive shaft.
3. Secure the cross assembly with the circlip.
4 . Apply genuine Nissan grease or equivalent to the cross assembly and sliding surface.
5. Install the slip joint housing onto the cross assembly.
6. Fit the cover firmly into the grooves.
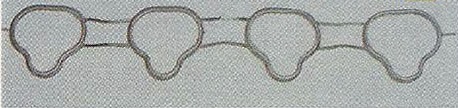
7. Make sure that the installation length of the cover L corresponds to the length indicated in the figure, insert a screwdriver or similar tool under the cover from the narrow side. Purge the air from the case to avoid deformation.
Notes:
If the installation length of the cover is less than the standard, the cover may break. Do not touch the inside of the case with the tip of the screwdriver.
8. Secure the narrow and wide sides of the cover with new clamps.
9. Press the thrust bearing into the housing using a punch.
10. Insert thrust bearing into housing and secure with circlip.
11. Press the thrust bearing assembly into the housing using a punch.
12. Secure the thrust bearing assembly with the circlip.
13. Press in the boot using a brass rod and a flat-bladed screwdriver.
14. Press the transducer disc into the pivot assembly using a punch.
15. In order not to damage the cover, wrap the spline of the drive shaft with electrical tape. Then put the clips on the boot and the boot on the shaft.
16. Remove the insulation wrapped around the shaft spline.
17. Place the ring clamp on the shaft. When doing this, make sure that the ring clip fits securely into the groove on the shaft. Place a nut on the pivot assembly and press it onto the shaft with a wooden mallet.
Notes:
Removed clamps cannot be reused.
18. Fit the cover firmly into the grooves.
Notes:
If there is grease on the seating surfaces of the boot (marked *) on the hinge, the boot may come off. Remove all grease from surfaces.
19. Make sure that the installation length of the boot L corresponds to the length. Insert a screwdriver or similar tool under the cover from the wide side. Purge the air from the case to avoid deformation.
20. Secure the narrow and wide sides of the cover with new clamps. Check the installation status of the cover. Rotate the hinge and make sure the boot is secure. Otherwise, reinstall boot clamps.
21. If the dynamic shock absorber is removed, fix it with clamps as shown in the figure so that the dimensions from the side of the fixed hinge correspond to those indicated below.
Installation
1. Install the support bearing bracket on the motor and tighten the mounting bolts to the correct torque. Connect the drive shaft to the axle shaft and tighten the fixing bolts to the required torque.
2 . In order not to damage the differential axle oil seal, first place the protection on the oil seal before installing the drive shaft. Insert driveshaft sliding joint and tap with a hammer to secure installation.
3. Insert the mounting bolt into the steering knuckle and strut. Secure the brake hose to the strut with the lock plate. Insert the drive shaft into the steering knuckle. Install washers and temporarily tighten locknuts.
4. Press the tie rod into the steering knuckle. Install the ABS wheel sensor. Tighten the locknuts to the required torque. Install the pin.
The article is missing:
- Tool photo
- Photo of parts and consumables
- High-quality repair photos
Source: http://www.faqnissan.ru/faq/006/10619.html